Rate this article :
5/5 | 2 opinion
This article was useful to you ?
Yes
No
Vous avez noté 0 étoile(s)
Sommaire
Procédure
Before you start using GIT on your hosting, it's important to understand what this system is all about.
GIT is a version control system, i.e. a system that allows you to manage projects of any size simply and efficiently. Each person involved in the project can work simultaneously on different parts of it. Every version of the project, every folder and every file is saved, so it's easy to go back to previous versions of the project at any time.
In addition, thanks to the branch system, it is possible to divide the project into different parts, different branches, on which team members can work in parallel. All these branches can then be merged into a single project, making team collaboration much easier.
In short, GIT is an almost essential system for any team, as it allows all the changes made by each member to be taken into account, even for projects that have no connection with programming, and to be accessed from anywhere.
It's also important to mention the Web terminal, which is an access point for executing various commands.
As part of your hosting, you can access your Web terminal via the LWS Panel. This terminal allows you to access your hosted files and run various commands, including commands for using GIT, as we saw earlier.
Now that you have a better understanding of what it's all about, it's time to access your terminal.
To do this, go to your LWS Panel and log in to your Customer Area using your Customer Identifiers. Once logged in, select the domain on which you wish to access the terminal, then click on the "Manage" button to access the dashboard for this domain.
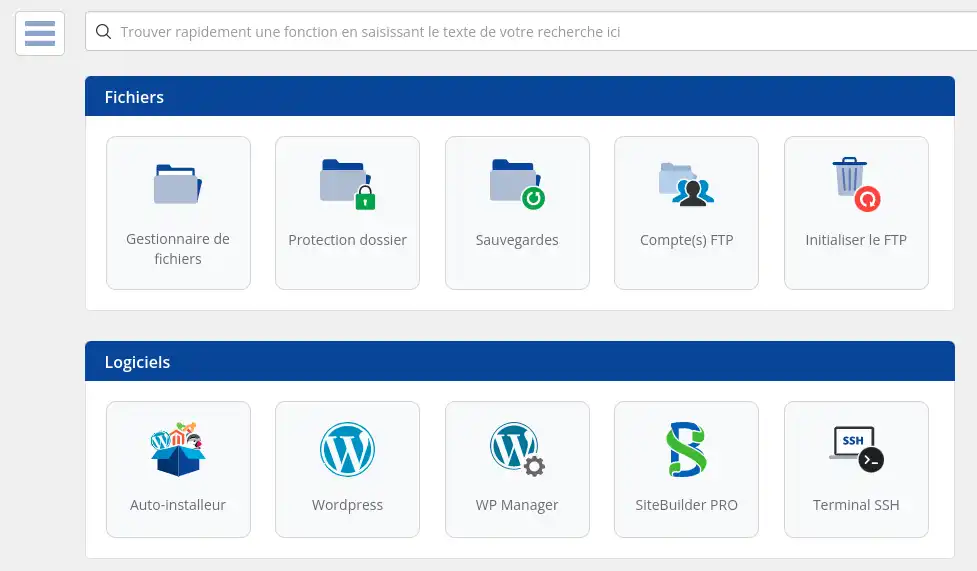
Once on the dashboard, you can access your SSH Terminal by clicking on the "Software" tab and selecting "Terminal" on the far right.

Before you start creating and managing projects, here are a few basic commands for using your terminal.
ls
This command displays all the files and folders contained in your current directory, which by default is /home/ (or ~/). It is very useful for quickly viewing the contents of a folder.
cd Examples: cd Documents cd Documents/Photos cd ../Telechargements
This essential command lets you navigate your server's folders. To move to a folder and then to a sub-folder in a single command, you need to separate the folders with a '/'. If you want to access a parent folder, type '../' after the command.
If you want an overview of all the files and sub-folders accessible from your current location, simply type the command in your terminal and press the 'Tab' key twice.

You'll get a list of the contents of your current directory and the items you can access.
touch mkdir rm rmdir cp mv Examples: touch MyFile.txt touch Documents/Files/MyOtherFile.html mkdir MyFile rm MyFile.txt rmdir MyFile cp MyOtherFile.html Documents/Images mv MyThirdFile.txt Downloads
Finally, here are some basic file management commands. These commands will enable you to create, move, copy and delete files and folders. Combined with the previous commands, you are now ready to start learning GIT.
In order to use GIT, you need to know the basic commands. Although they are all listed in the GIT documentation, this can be difficult for beginners to understand, especially as it is entirely in English. That's why, in the rest of this article, we'll take a detailed look at the commands that are essential for using GIT effectively.
Before you start, run this command to position yourself in the correct directory on your hosting:
cd htdocs
If you are new to GIT (and by extension GitHub), the first step is to create a free account on the official GIT website. Once your account has been created, you can return to your web terminal and start using the commands.
git config --global user.name ""
git config --global user.email ""
Une fois que vous avez saisi les commandes nécessaires et vérifié que les identifiants sont corrects, si tout s'est bien passé, vous ne devriez pas recevoir de retour : c'est normal ! Les commandes ont fonctionné. L'objectif de ces commandes est de vous identifier pour s'assurer que vous êtes autorisé à pousser des modifications sur le dépôt de votre projet. Sans cela, vous ne pourrez pas faire grand-chose avec GIT.
Il est essentiel de connaître une autre commande, car c'est elle qui vous permettra de commencer réellement à utiliser GIT :
git init
La commande suivante est essentielle pour commencer à utiliser GIT, car elle permet de définir le dossier actuel en tant que dépôt local GIT. C'est dans ce dossier que vous allez démarrer votre projet. Avant de l'exécuter, utilisez les commandes vues précédemment pour créer un nouveau dossier pour votre projet et vous y rendre.

Une fois que vous aurez exécuté cette commande, un message vous indiquera qu'un nouveau dépôt GIT a été correctement initialisé dans votre dossier.
Maintenant que vous avez initialisé votre dépôt local GIT, vous pouvez commencer à travailler sur votre projet en y ajoutant des fichiers. Mais vous pouvez également récupérer un dépôt GIT déjà existant et le copier sur votre hébergement pour travailler dessus. Pour cela, vous devez simplement exécuter la commande suivante dans votre nouveau dossier :
git pull
You can obtain the URL of the repository from its page on GitHub, in your list of repositories:
.webp)
Once you've run the command, you'll get this result:

If all went well, you should find all the folders and files in your repository in your local folder. You can check this by typing the "ls" command.
Now that you have run these commands, you have created a new GIT repository. However, you may want to retrieve an existing repository instead of creating a new one. In this case, you can use the following command:
git clone .git
Replace the URL with that of your repository, which you can obtain by visiting it on GitHub, as with the previous command.
Don't forget to add ".git" at the end of your URL, otherwise the command won't work. What's more, when you use this command, GIT will automatically create a folder with the same name as your repository, so you can run it in the default location on your hosting, unlike the previous command:

With the command now executed, your repository is downloaded from GitHub to your hosting. You can run the 'ls' command to be sure:
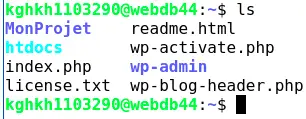
You can see that a "MyProject" GIT repository has appeared. Note that this command only makes a copy of a repository on your machine. To work on it, go to the folder and run "git init", which will transform this repository into a new GIT repository different from the original one. The online repository and the repository you have locally are not linked and any changes to one repository will not affect the other.
Now that you've learned how to create a local repository, it's time to see how to publish your changes online. To do this, you'll need two commands :
git add . git commit -m ""
The first command, "git add", is used to analyse everything that has changed, whether it's a file/folder added, deleted or modified, so that GIT knows what needs to be put online. The second, "git commit", is used to create a "commit" of these changes, a capture of everything that has happened in your repository. It is necessary to leave a message when you make a commit, which can be a simple "My commit" or a more complex message reflecting the changes made.
Once these commands have been executed, you will receive a message confirming all the changes, ready to be sent to your online repository:

All that's left to do is upload the repository using these commands:
git remote add origin .git git push https://{TOKEN}@github.com/{username}/{depot}.git
The first command, to be run only once, tells GIT the address of the online repository to which you want to send your changes. This step establishes the connection between your local repository and the remote repository, and you will no longer need to repeat it each time you upload.
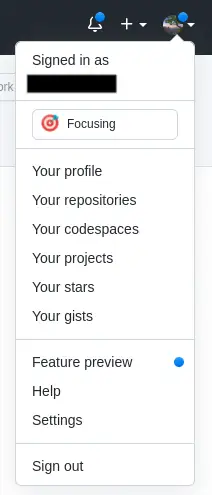
You can access "Developer settings" by going to the very bottom of the menu on the left in your GitHub account settings.
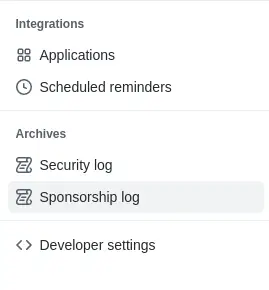
Once in the settings, scroll down to the bottom of the left-hand menu and click on "Developer settings". On this page, click on "Personal access tokens", then on "Generate new token" to access a new page. You will need to give your token a name, select an expiry date and tick the appropriate boxes (particularly those in the "repo" category). Once you have selected the options, create your token by clicking on the button at the bottom of the page.
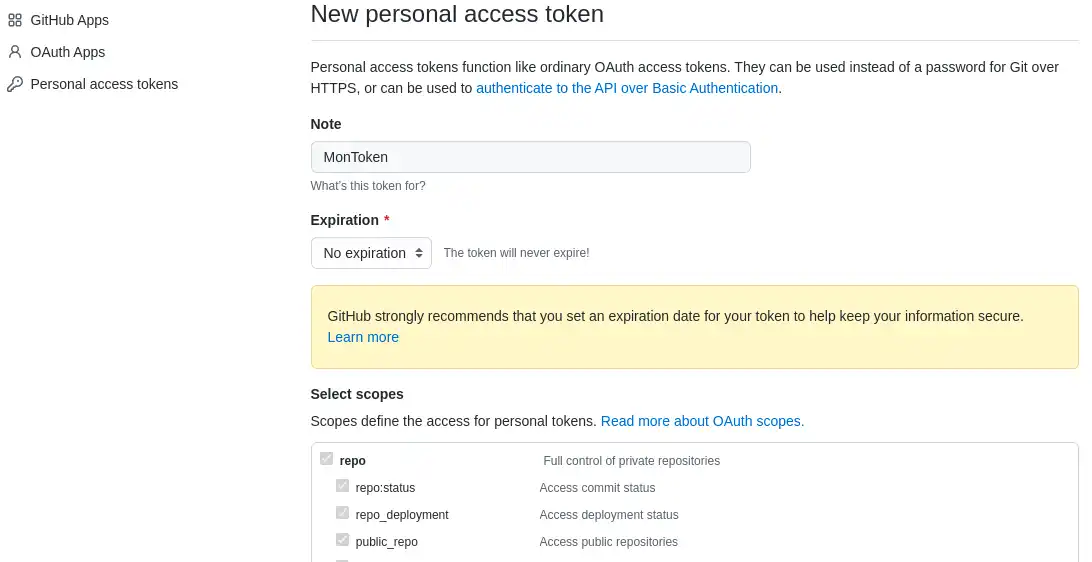
Copy the token provided by GitHub on the following page and keep it safe, as you won't be able to consult it once the page is closed, and you'll need it for every push from your terminal.
Once on your profile, click on the green "New" button to access a new page:

On this page, simply enter the name of your repository, a description (optional) and choose the visibility of the repository: Public or Private. A public repository is visible to anyone who knows its name, while a private repository is only visible to those authorised by the author:
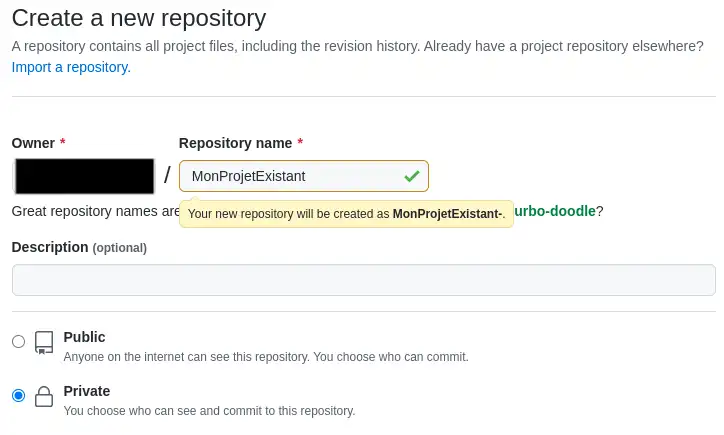
Then click on "Create repository" at the very bottom, without bothering with the other options:

You will be redirected to your repository page, where you will see a coloured box:

Now copy the name of your repository without forgetting the ".git" part.
Now that you have all this information, you are ready to run the command. A confirmation message will then appear, indicating that your changes have been added to your project's online repository. :

Congratulations, you have now learned the basic GIT commands. You are now able to create a local and online repository, add commits and update the online repository.
GIT offers two commands for managing commits in more detail:
git status git diff
The first command displays modified files that need to be committed:

You can see that the file "index.html" has been modified and needs to be committed using this command.
The second command allows you to view the changes made to files, rather than simply indicating the name of the file that has been modified.
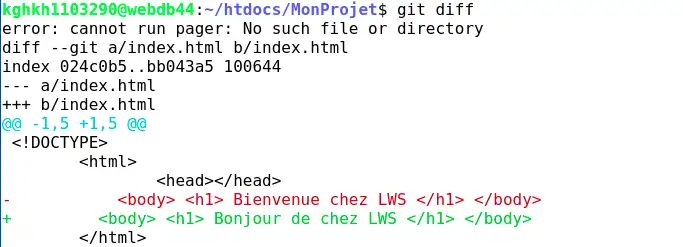
Using this command, you can see the changes made to each file. Additions are indicated by green lines starting with a + and deletions by red lines starting with a -. In this example, we can see the changes made to index.html on the 'master' branch, which is the default branch.
With GIT, you can create branches for your project. These branches allow you to make changes without affecting the other branches or the main branch. You can, for example, create a test branch or several branches for each member of your team, so that everyone can work in parallel without affecting the work of the others.
To create a new branch, you can use the following command:
git branch

To switch to the new branch, use the command :
git checkout
Make sure you replace

When you switch to a new branch, all the changes you've made to the previous branch and committed remain there until you switch back. This allows you to work on a version 2.0 of your project, then change branch to fix a bug in version 1.5.1, and come back to version 2.0 very easily.
However, if you don't commit your changes before changing branch, they will follow you to the new branch. If these changes cannot be integrated because of conflicts, you will not be able to change branch.
With the commands we have seen so far, you are able to update your online repository with changes from your local repository. However, if you work in a group, your colleagues may also update the repository with their changes. To retrieve these changes from your local repository, use the command :
git pull https://{TOKEN}@github.com/{username}/{depot}.git
This command retrieves all the changes that have been committed and pushed to the online repository and integrates them directly into your local repository. It is actually a combination of two commands:
git fetch --all git merge https://{TOKEN}@github.com/{username}/{depot}.git
The first command, "git fetch", retrieves changes that have been "committed" and "pushed" to the online repository, without integrating them directly into your repository. The second command, "git merge", integrates these changes into your local repository. By combining the two commands with "git pull", you can retrieve and integrate the changes in a single operation.

When a file named "myTest" is added to the online repository, the pull command allows you to retrieve it and add it to the local repository. If you are prompted to enter a message explaining the reason for the merge, you can do so at the location indicated. To validate and save the message, you can press "CTRL" and "X" at the same time to close the page, type "Y" to confirm the save, then press "Enter". If you prefer to keep the default message, you can simply press "CTRL" and "X" at the same time.
Sometimes you may want to undo a commit or return your project to the state it was in several commits ago. Fortunately, there are several commands for this:
git log --oneline git revert git reset HEAD~
The first "git log" command displays a list of all the commits made on the current branch, with their ID and name. This command is very useful for finding out where you are in your project, and also for using the next command.

The second command, git revert, is used to undo a commit by specifying its identifier. For example, if you want to undo the commit whose ID is "f605f57", you can use the following command:

This command was used to cancel the "Changes index.html" commit. This commit modified the text contained in index.html. Now that it has been undone, the document has been restored to its original content. However, it is important to note that a commit indicating that a revert has taken place is automatically created. This means that the revert itself can be undone if necessary.

The third command is the trickiest because it completely undoes all the changes made over a given period and it is not possible to go back once it has been executed. This command can therefore cause irreparable damage if it is misused or misunderstood. It is therefore recommended that you use it with caution and only if you have a good understanding of its basic operation:
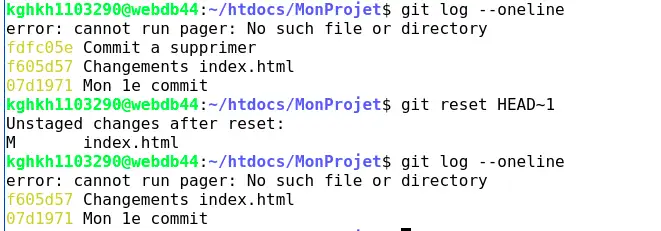
Here, the "MyProject" repository has been reset using the "reset" command with option "1". This deleted the last commit made, returning the repository to the state it had before that commit. It is important to note that this command can cause irreversible data loss if used incorrectly, so it is recommended that you handle it with care.
If you misplace your token, it will no longer be possible to recover it and you will need to generate a new one.
To do this, follow the steps mentioned in the documentation to access the developer options, or go there and select the token you want to regenerate.

On the page for the token in question, simply click on the "Regenerate token" button in the yellow box to regenerate the token.

Finally, select an expiry date of your choice and then click on the "Regenerate token" button to regenerate your token.

Once the token has been regenerated, you will be redirected to the page for your new token. Make a note of it carefully and keep it safe, as it will not be possible to see it again once you have left the page.
When you're on your Web terminal, you can press the up arrow to go back to commands you've already executed. This feature can save you time, especially if you need to redo a complete command such as "git push" or "git pull", which can be lengthy. If you find the command you want, you can modify it if necessary, then press "Enter" to run it again.
Once you've started working your way back through the commands, you can use the down arrow to go back down to the recent commands.
Now that you've mastered the basic commands and GIT, you should know that there are a host of other more complex and advanced commands with GIT.
If you'd like to learn more about GIT, here's a list of websites in English and French that can help you get started:
These tutorials and courses go into more detail about GIT and give you a deeper understanding of the tool. If you are planning to use GIT in an advanced way, these resources are highly recommended. However, if you are simply looking for a basic use of GIT, this current documentation should be more than enough for you.
Rate this article :
5/5 | 2 opinion
This article was useful to you ?
Yes
No
1mn reading
How do I connect to the Web Terminal with LWS Panel? (ssh web console)
2mn reading
How to change the PHP version of the LWS Panel Web Terminal
0mn reading
What can I do on my WordPress site using the Web Terminal?
0mn reading
How can I use the Web Terminal on my Prestashop site?