Rate this article :
4.5/5 | 2 opinion
This article was useful to you ?
Yes
No
Vous avez noté 0 étoile(s)
Sommaire
Procédure
Find out how to save your emails (located on your web hosting plan) by transferring them to your computer using the free Thunderbird software. This can be particularly useful if you want to change your package (e.g. from LWS Panel to cPanel or vice versa, in which case this help may be of assistance).
First of all, download Thunderbird if you haven't already installed it on your computer. You can also use Outlook if you prefer.

1. Open the Thunderbird desktop application. Click on "Account Settings".
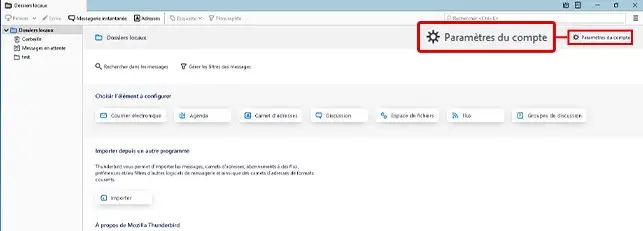
2. Click on the"Account Management" button and then select"Add an e-mail account".

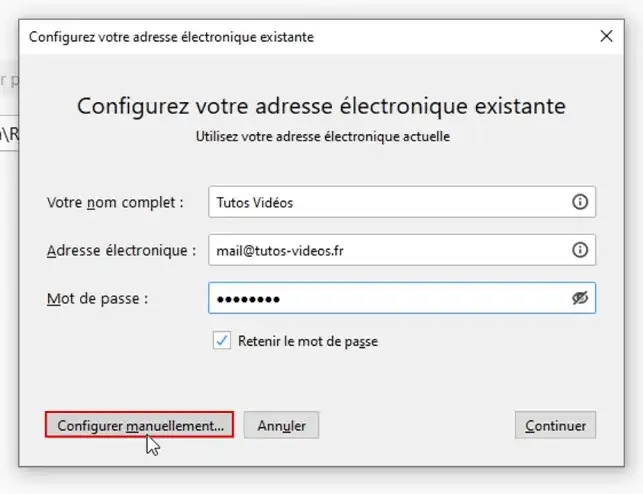
3. Fill in the various fields as follows:
Then click on the"Configure manually" button.
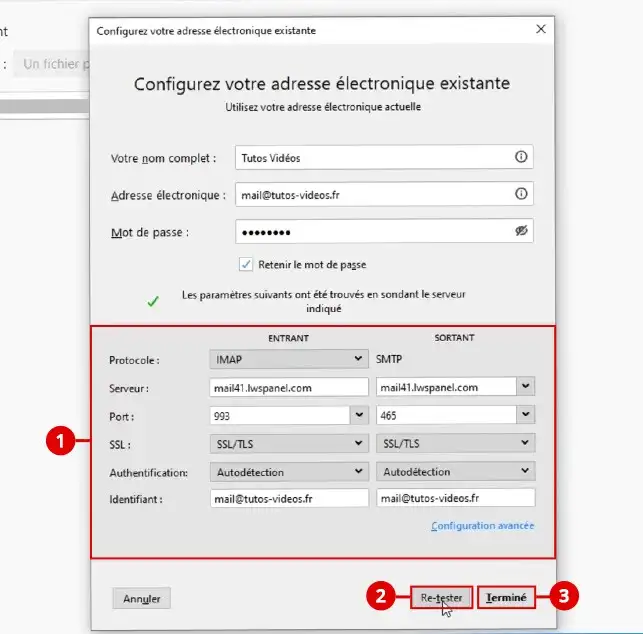
4. Fill in the fields concerning the protocol to be used (preferably IMAP) in this section.
The IMAP protocol stores emails on a server and synchronises messages and folders (inbox, sent messages, drafts, archives, etc.) between the server and the devices used, unlike the POP protocol, which only saves emails in the inbox. However, you will need to do something afterwards to desynchronise Thunderbird emails from the active server. We will then transfer them locally.
When you created your mailbox in your mail software, you had to choose between a secure connection, i.e. with secure SSL/TLS settings or not. Choose one or other of the settings. We advise you to choose the secure SSL/TLS settings to increase the security of your exchanges.
For information, you can find the fields to fill in by consulting the "Mail Management" section of your LWS Panel for the email address concerned by the migration or the "Mail Accounts > Connect Devices" section of your cPanel (this depends on the admin panel used by the package hosting your email)
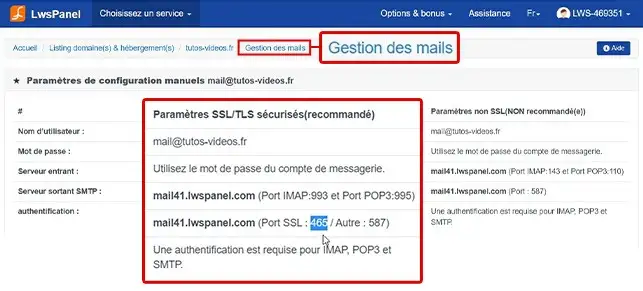
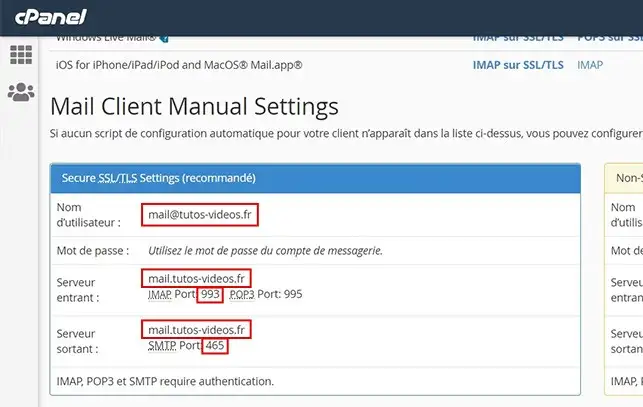
Incoming server settings :
Outgoing server parameters :
5. Click on the"Retest" button to check that your configuration is correct.
6. Finally, click on the "Finish " button to transfer your emails to Thunderbird. Your emails will now load onto your Thunderbird software. Wait a little while for all your emails to arrive before moving on.
Your mailbox has been added.
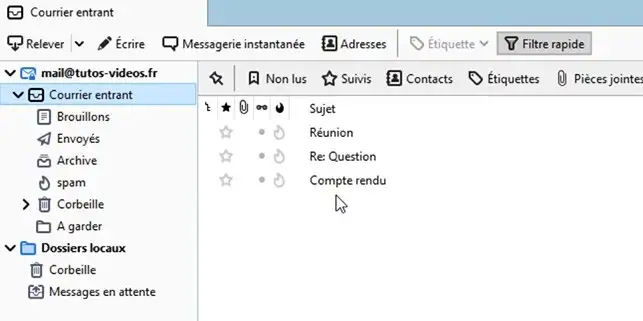
7. The IMAP protocol does not download or save emails on your computer, so we need a local backup so that emails are not deleted when they are removed from the server, for example (when changing formulas to another admin panel, for example). Here we want to make an independent backup. So you need to move all your emails into your local Thunderbird folders so that they remain on your computer even if you delete them on your mail server. Here's how to do it.
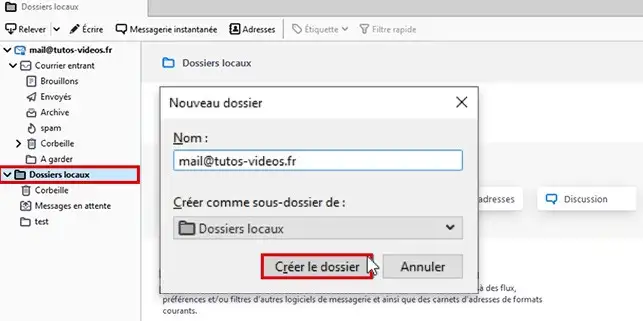
First, click on "Local folders". Right-click to create a new folder with the name of the mailbox you want to back up.
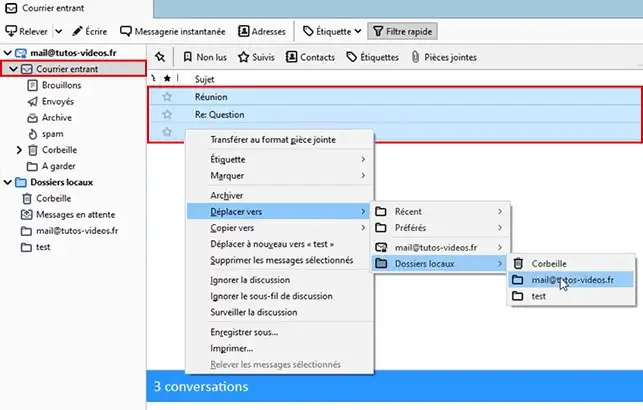
8. In your inbox, which contains your incoming emails, select the first email and, to select all your emails, simultaneously click the Ctrl and A keys on your keyboard.
Then right-click on the "Move " button and select your previously recreated folder in your local folders.
9. If you have a mail archive folder created on your old mailbox, recreate this folder locally. Select the emails in your old Webmail folder and move them to your local folder. You can do the same to move your sent emails if you want to keep them.
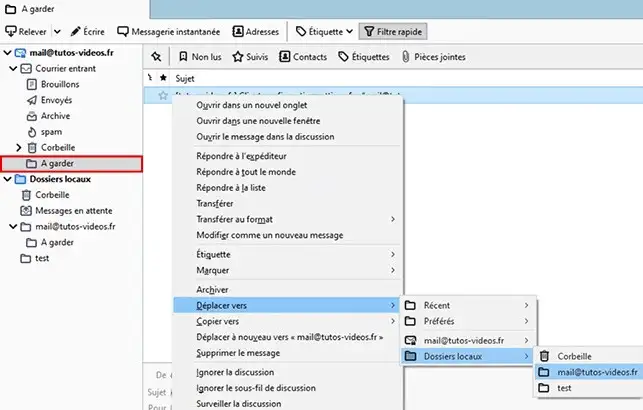
Wait for all your mail to arrive there before moving on. If you have several mailboxes to back up, you can create several folders in your local folders to find your way around.
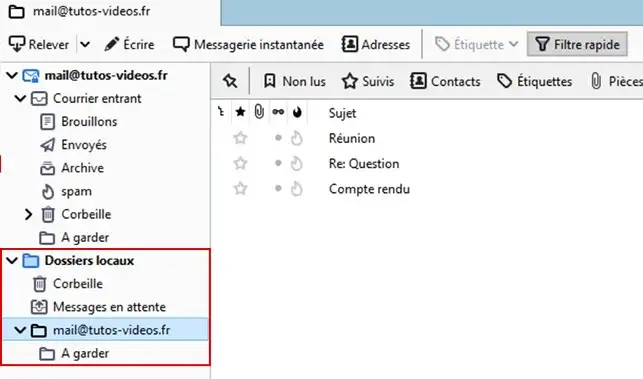
You can delete the old mailbox saved in Thunderbird and empty of its emails (these are now stored in your local folders). Right-click, go to the account settings and, at the bottom of the page, delete the account.
If you change your Web package, you may need to restore your emails to your new package. To do this, you will first need to recreate the email addresses before restoring the content:
Once this has been done, you can restore your mail previously saved locally on your Webmail by following the procedure below.
1. Reopen the Thunderbird desktop software. Click on"Account management" and then on"Add an email account".

2. Fill in the required fields:
Then click on the"Configure manually" button.

3. Fill in the Incoming server fields :
Fill in the 'outgoing server' section in the same way and click on"Re-test" then "Done" once all the fields have been filled in.
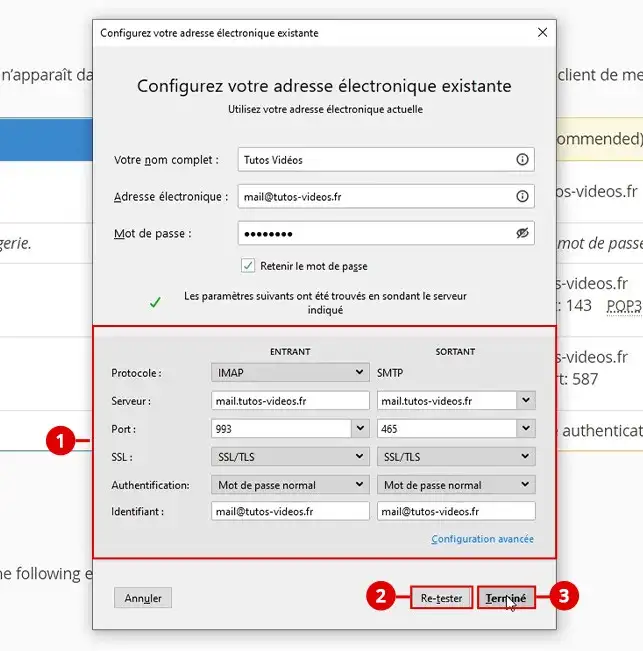
4. The account is added. Go to the local mailbox that you used to save your emails earlier. It contains your emails, unlike my configuration.
Select the emails received from the backup mailbox. To do this, select an email and simultaneously click the [CTRL] and A keys on your keyboard.
Right-click on your mouse, go to "Move to" and then choose your new mailbox created on cPanel. You can do the same with sent mail if you think it would be useful. Recreate your extra folders if you had any and move the emails from your old formula into them.
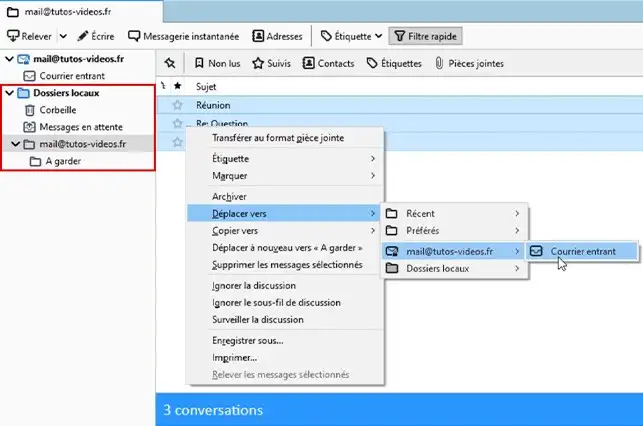
The emails will now be visible in the Webmail of the email address of your new Web package. If you have a lot of email, the transfer from Thunderbird to Webmail may take a little longer. All your data will now be restored to your Webmail and transferred to your cPanel package.
You are now able to back up and restore emails using the Thunderbird software on your hosting package with LWS.
Don't hesitate to share your comments and questions.
Rate this article :
4.5/5 | 2 opinion
This article was useful to you ?
Yes
No
1mn reading
How do I save emails in webmail?
0mn reading
How can I save these emails on my computer?