Rate this article :
5/5 | 1 opinion
This article was useful to you ?
Yes
No
Vous avez noté 0 étoile(s)
Sommaire
Procédure
When you browse the Internet and use online services, it is essential to ensure the security of your data and your website. LWS offers anti-virus and anti-malware functionality to help you protect your site from online threats. In this article, we will guide you through the use of this functionality to ensure optimum protection for your website.
To run an anti-virus or anti-malware scan on your hosting, follow the steps below:
Step 1: Connect to the LWS Client Panel.
First you need to log in to your LWS customer area to access your hosting management. This documentation will help you log in.
Step 2: Accessing your hosting's anti-virus and anti-malware management
To do this, first select the hosting you are interested in from the list of products in your account.

Click on the "Manage" button for the product you are interested in.
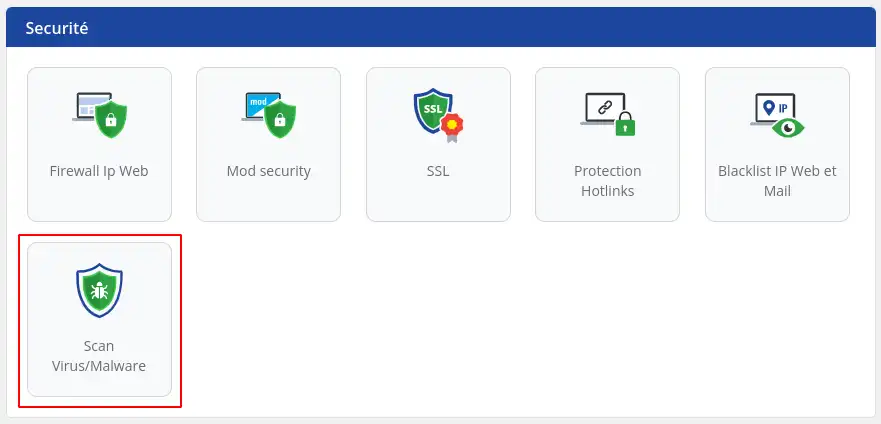
Once in your hosting management, find the "Security" section.

Then click on "Scan Virus / Malware".
When you access the "Scan Virus / Malware" function, the "scan" tab and its contents are automatically displayed. This page allows you to manually run an Antivirus Scan or a Wordpress Integrity Scan directly.

Manual antivirus scan
A web hosting antivirus scan is a procedure carried out to check the presence of malicious software on hosted websites. It is a process that examines files and scripts running on the server for suspicious code or behaviour.
The main purpose of a web hosting anti-virus scan is to detect and remove malicious software such as viruses, Trojans, malicious scripts, unwanted programs, backdoors and other forms of malware. Antivirus scans are essential to ensure the security of hosted websites, protect user data and prevent potential attacks.
During a web hosting anti-virus scan, the files and directories on each website are scanned for known malware signatures.
If malware is detected, LWS takes steps to quarantine infected files to protect other sites hosted on the server. You are then informed of the results of the scan and the measures taken to resolve the problem.
Wordpress scan
A WordPress integrity scan is a process that checks the integrity of the files in your WordPress installation. Essentially, it is a check of the structure and integrity of the core WordPress files, such as the WordPress core files, themes and installed plugins.
The main purpose of a WordPress integrity scan is to detect unwanted changes or corrupted files that could compromise the security or proper functioning of your website. This could include malicious files added by hackers, unauthorised modifications to the WordPress source code or accidental alterations that could occur during updates or plugin installations.
The WordPress integrity scan compares the files in your installation with a reference of the original files. If a difference is detected, this may indicate an unauthorised alteration or modification. In this case, you can take steps to resolve the problem, such as deleting the malicious files or restoring the original files from a backup.
In summary, a WordPress integrity scan is a verification process that ensures that the files in your WordPress installation have not been altered in any unwanted way, thus guaranteeing the security and integrity of your website.
By default, when your hosting is delivered, an anti-virus scan and a WordPress integrity scan are performed automatically once a week. However, you can deactivate or reactivate these automatic scans at any time.
To do this, go to the "Settings" tab.

If you are accessing this page for the first time, the scans are activated by default. If you want your hosting to be scanned every week, you don't need to do anything. On the other hand, if for any reason you wish to deactivate the automatic scans, simply click on the "deactivate" button for the scan you no longer wish to run.
If, on the other hand, you have already deactivated the scans, this same page will suggest that you activate them, as shown in the screenshot below:

The antivirus scan history is a valuable tool for monitoring the security of your website. By examining the results of previous scans, you can detect trends and patterns that could indicate potential security problems. For example, if you see a sudden increase in the number of infected files during a certain scan, this may indicate an intrusion attempt in progress. By analysing this data, you can take preventive measures to strengthen the security of your site, such as updating your plugins, correcting known vulnerabilities or reinforcing protection measures.
In short, the antivirus scan history is an essential tool for monitoring the security of your website and taking proactive measures to protect your data and your users.
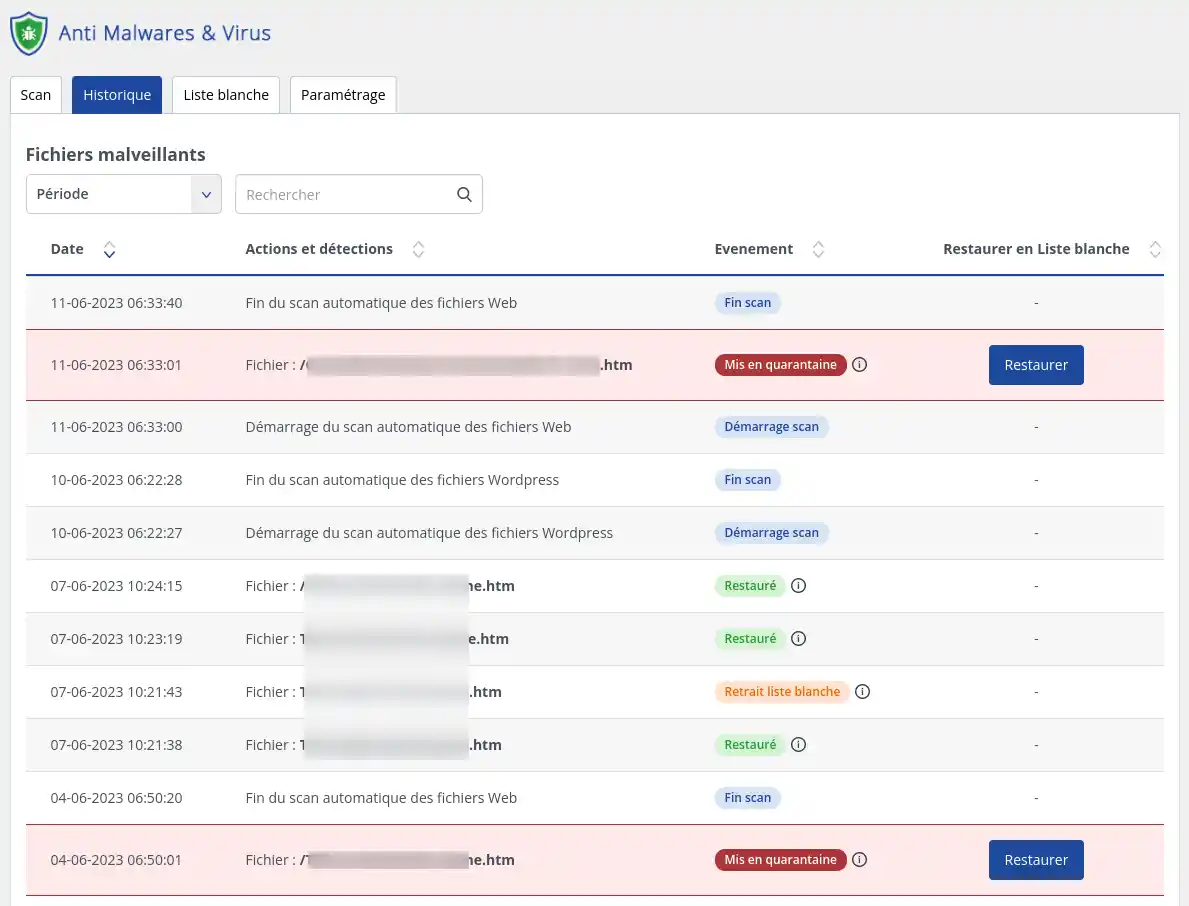
The History is visible from the tab of the same name:

On the History tab, you can choose how long you want to view the results: you can view the results of scans up to 30 days after they were performed.
Potentially dangerous or malicious files appear on red lines with the quarantine action.
Quarantine is an essential security measure when it comes to malicious software detected on your website. When a suspicious file or item is identified, it is isolated in a separate quarantine space, away from the rest of your system. This prevents the spread of malware and minimises potential damage. Quarantine gives you the time you need to assess the threat, take appropriate measures, such as deleting or disinfecting the files concerned, and restore security to your site before reintegrating them into your production environment. This is a crucial step in protecting your data, your files and the overall health of your website.
[
To remove a file from quarantine, simply click on the "Restore" button at the end of the line for the file concerned. This action returns the file to its original location and automatically adds it to the white list so that the antivirus does not block it again.

Whitelisting a previously quarantined file is a procedure for restoring confidence in a file by re-regarding it as safe and legitimate. When a file is quarantined, it means that it has been identified as potentially dangerous or malicious. However, some files may be incorrectly classified as malicious due to false detections or overly restrictive security settings. In such cases, it is possible to whitelist the file, which involves considering it safe and reintegrating it into your system by removing all the security restrictions that were applied to it.
It is important to understand that whitelisting a quarantined file should only be done when you have absolute confidence in the legitimacy and security of the file. There are various reasons why a quarantined file may be whitelisted. Firstly, it may be a false positive, meaning that the file has been wrongly identified as malicious. In this case, further analysis may confirm that the file is harmless and that there is no real threat associated with it. Secondly, the file may be essential to the proper functioning of your website or applications, and quarantining it may cause malfunctions or errors. In this case, if you are certain of the file's legitimate origin, you can whitelist it to restore normal functionality. Finally, if you have carried out additional checks, such as in-depth security scans or manual analysis, and are satisfied that the file is safe, you can whitelist it to facilitate its future use without security restrictions.
To whitelist a file or folder, click on the "whitelist" tab in the "Scan Virus / Malware" feature.
The list of files or folders already whitelisted appears.

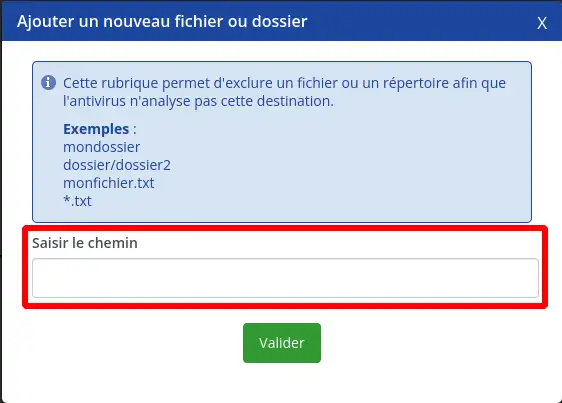
1. Click on the button " + Add a file or folder to ignore".
2. Enter the path of the file or folder you wish to ignore. The path entered must be an absolute path from the root of your hosting.

3. Click on the "Confirm" button, and you will return to the list of whitelisted files and folders, updated with your new entry, which will be taken into account during the next scan.
To remove a file from the whitelist, simply click on the "Remove" button on the line containing the path to the file or folder you wish to remove from the whitelist.

The action is taken immediately and the file or folder will be scanned again the next time it is scanned.
As well as using antivirus and antimalware software, it is important to follow a few additional good security practices. Use strong, unique pass words for your LWS account and other online services. Make sure you regularly update your applications and plugins to take advantage of the latest security patches.
LWS antivirus and antimalware functionality provides valuable protection for your website against online threats. By activating and configuring these tools, you can strengthen your site's security and ensure that it remains protected against attacks. Don't forget to follow additional good security practices and stay vigilant online. Website security is essential to protect your data and provide a safe online experience for your site visitors.
Rate this article :
5/5 | 1 opinion
This article was useful to you ?
Yes
No
1mn reading
How do you protect access to a directory on your web hosting?
1mn reading
Web application firewall
0mn reading
How to set the IP Firewall
1mn reading
Protection hotlinks