Rate this article :
This article was useful to you ?
Yes
No
Vous avez noté 0 étoile(s)
Sommaire
Procédure
Most hosting packages offer a limit on the size of a SQL Server database.
With Plesk, if the critical limit is exceeded, the subscription is suspended and the website is no longer functional.
It is therefore important to act proactively and reduce the size of this database before the quota is exceeded.
A SQL Server database is made up of two files. One file containing the data, stored procedures and structures of the database and another file called the "log" containing the transactions of all the modifications made to the first file.
In Plesk, it is the sum of these two files that is taken into account and used as a reference for calculating the size of your database.

If your database starts to reach a critical threshold, the first idea that comes to mind is to delete data to free up space. But it's not that simple with SQL Server, because by deleting data, you carry out deletion requests which add to the size of the log file and, in most cases, have the unintended effect of increasing the size of the files instead of reducing it.
So what's the solution? There are generally two things to do: check which of the two files is causing the problem in terms of size and act on it to reduce it.
1. Connect to your Plesk control panel then click on"Databases" then on the"MyLittleAdmin" button of the desired database.
2. Once the MyLittleAdmin utility is displayed, click in the left-hand column on the "+" to the left of"User Databases", then click on the name of your database and finally click on the properties display icon.

3. A new window appears. Click on the"Files" tab to view the two lines of interest to us, as shown in the screenshot below.

The first line corresponds to the size of the file (.mdf) containing the data. In the example, this is 104 MB.
The second line is the size of the log file (.ldf) containing the transactions. In our example, the size of this file is 456 MB, or more than 4 times the size of the data file.
This shows the importance of purging the log file in order to save storage space for your SQL Server database.
1. To carry out this action, we need to import your formula's SQL Server database into the SQL Server Management Studio software.
To carry out this procedure, please follow this documentation: https: //help.lws-hosting.com/en/How-to-transfer-a-SQL-Server-database-between-Plesk-and-SQL-Server-Management-Studio
2. Once your database has been imported, all you need to do is reduce the size of the log file by deleting the logs using a task executed by the software.
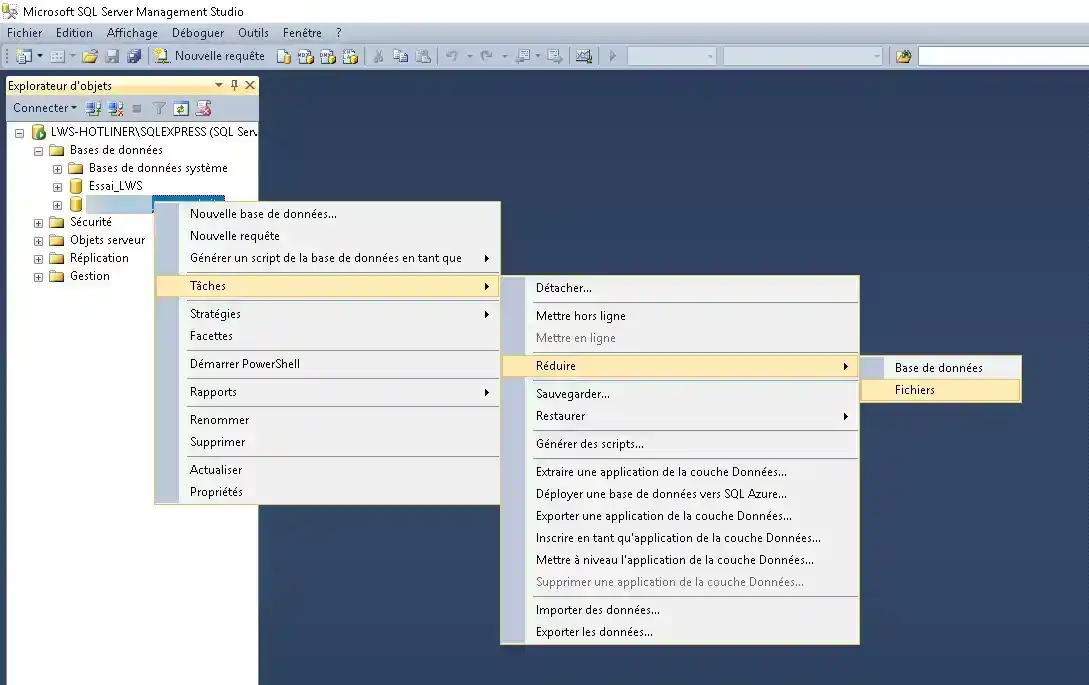
To do this, right-click on the database and then click on Tasks -> Reduce -> Files in the drop-down menu.

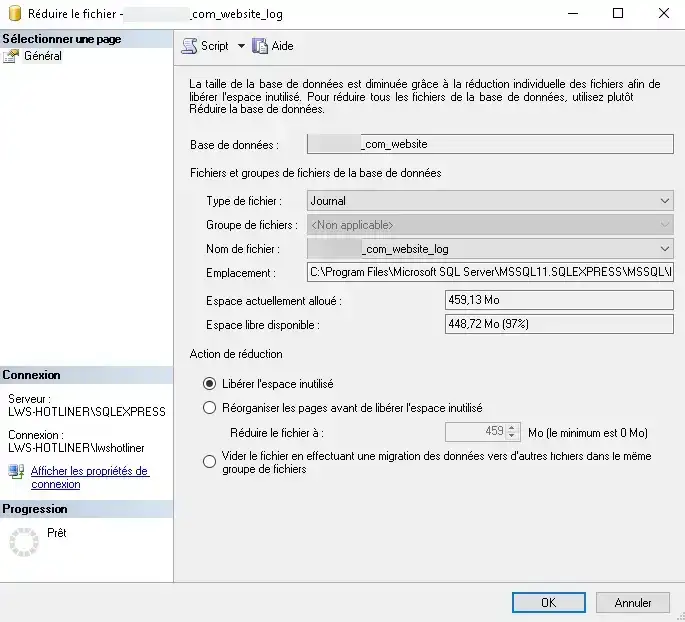
3. In the window which then appears, simply select the type of file you wish to reduce (in our case the log file, but you can also perform the operation with the data file).
In our case, an optimisation of 97% is possible. After the operation, the size of the log file will be just over 10MB compared with 459MB previously.

4. Once this operation has been carried out, simply reimport your database into Plesk by following this documentation: https: //help.lws-hosting.com/en/How-to-transfer-a-SQL-Server-database-between-Plesk-and-SQL-Server-Management-Studio
We have seen how to reduce the transaction log file in order to free up space for your data. The content of this log file is largely determined by the data recovery mode. If this is set to 'FULL', the file will grow faster than if you set this option to 'Simple'.
For more information on this subject, please read this article: https: //www.pulsweb.fr/logs-sql-server/
To display or modify the recovery mode in SQL Server Management Studio, please follow this procedure:
1. Right-click on the database, then click on Properties to open the Database Properties dialog box.
2. In the Select a Page pane, click Options.
3. The current recovery mode is displayed in the Recovery mode list box .
4. If you need to change the recovery mode, select another mode from the list. The choices are Full, Bulk Journaled or Simple.
5. Click OK.
You are now able to reduce the size of the files in your SQL Server database and consequently its overall size, as well as modifying the data recovery mode in order to limit the increase in the size of the transaction log file.
If you have any questions, please do nothesitate to contact our technical department via an incident ticket.
Rate this article :
This article was useful to you ?
Yes
No
1mn reading
How do I create a database in Plesk?
0mn reading
How do I create an ODBC link in Plesk?
0mn reading
How do I export a database to Plesk?
0mn reading
How do I install myLittleAdmin on Plesk?