Rate this article :
4.3/5 | 6 opinion
This article was useful to you ?
Yes
No
Vous avez noté 0 étoile(s)
Sommaire
Procédure
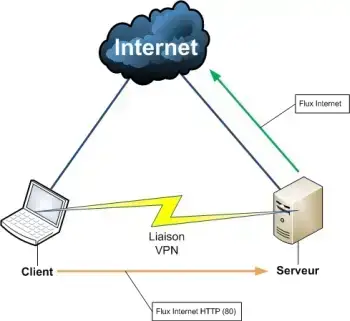
A VPN (Virtual Private Network) is a Virtual Private Network. It allows any computer on your network to access the data on your VPS server via a secure Internet connection.
This means you can access your VPS server's resources (shared files, intranet, extranet, etc.) as if the server were right next to you.
VPN is based on a protocol that encrypts and decrypts data on both sides of the tunnel using cryptographic algorithms.
The TUN/TAP interface is a feature for creating a virtual private network (VPN).
It is not activated by default on your VPS: go to your LWS Panel customer area to activate it.
Once the interface has been activated, you will be able to access it via the /dev/net/tun file. To use this interface, you will need to use a third-party program to connect your virtual private network to this interface.
Here is a list of programs that can use the TUN/TAP interface:
You will need to enter the path to the TUN/TAP interface (/dev/net/tun) in the configuration file for the programme you are using.
There are two steps to creating a virtual private network:
1) Activate the TUN/TAP interface on your VPS
2) Connect via SSH to your dedicated VPS server and install OpenVPN with the following command
apt-get install openvpn
3) Answer Y to the question "Do you want to continue [Y/n]?
4) Create a secret key :
openvpn --genkey --secret /etc/openvpn/static.key
5) Then create an OpenVPN configuration file :
nano /etc/openvpn/server.conf
dev tun0ifconfig 10.9.8.1 10.9.8.2secret /etc/openvpn/static.key
6) Then launch the server part of your VPN:
openvpn /etc/openvpn/server.conf
You should get a message like this to indicate that your VPN server is ready to receive a connection:
Thu Sep 22 15:12:59 2011 OpenVPN 2.1_rc11 x86_64-pc-linux-gnu [SSL] [LZO2] [EPOLL] [PKCS11] built on Sep 18 2008Thu Sep 22 15:12:59 2011 IMPORTANT: OpenVPN's default port number is now 1194, based on an official port number assignment by IANA. OpenVPN 2.0-beta16 and earlier used 5000 as the default port.Thu Sep 22 15:12:59 2011 /usr/sbin/openvpn-vulnkey -q /etc/openvpn/static.keyThu Sep 22 15:12:59 2011 TUN/TAP device tun0 openedThu Sep 22 15:12:59 2011 /sbin/ifconfig tun0 10.9.8.1 pointopoint 10.9.8.2 mtu 1500Thu Sep 22 15:12:59 2011 UDPv4 link local (bound): [undef]:1194Thu Sep 22 15:12:59 2011 UDPv4 link remote: [undef]
7) You can make this service start automatically by editing the /etc/default/openvpn file:
nano /etc/default/openvpn
...AUTOSTART="server
8) Then run the following command:
/etc/init.d/openvpn restart
Your virtual private network will then be active and will restart automatically the next time your VPS server is restarted.
9) Autostart on Systemd distributions (Debian 8)
For the Debian 8 distribution and all distributions using Systemd, you can make this service start automatically
ln -s /lib/systemd/system/openvpn@.service /etc/systemd/system/multi-user.target.wants/openvpn@server.service systemctl enable openvpn@server.service systemctl start openvpn@server.service
Once you have installed and configured the server, you can configure the virtual network client on your personal computer.
1) Download the OpenVPN software for Windows and install it.
2) Copy the contents of the file /etc/openvpn/static.key from your VPS to a file on your personal computer.
nano /etc/openvpn/static.key
This file looks like this:
## 2048 bit OpenVPN static key#-----BEGIN OpenVPN Static key V1-----dcc8ba6d9a866df2542ffed4427a460359e7cf502cf491e64b4ac8c6972e42ce...dc43643449e79e14b5a6894419256b0b-----END OpenVPN Static key V1-----
3) Copy the contents of this file into your favourite editor and save it in C:Program FilesOpenVPNconfigstatic.key

4) Create and edit the file C:Program FilesOpenVPNconfigclient.ovpn
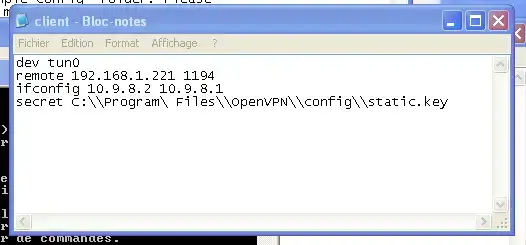
5) with the following content (Replace IP_VPS with the IP address of your VPS server) :
dev tun0remote IP_VPS 1194ifconfig 10.9.8.2 10.9.8.1secret C:\Program FileOpenVPN\config\static.key
6) Then launch your OpenVPN client.
To do this, open a file explorer and go to the C:\Program FileOpenVPNconfig folder. Then right-click on the client.ovpn file and click on "Start OpenVPN on this config file".
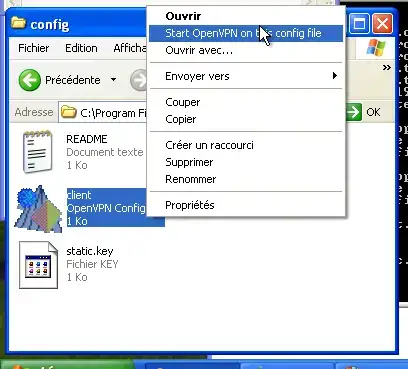
You should then get a command window that looks like the following image:
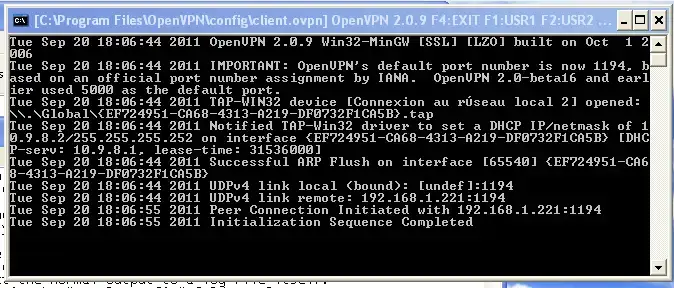
You will then be able to connect to your VPS server using the IP address 10.9.8.1 directly from your personal computer (in a web browser, putty or FileZilla for example). The connection will then go through your virtual private network and will be encrypted.
You can also access your personal computer from your VPS server using the IP address 10.9.8.2.
To close this network, simply close the command window (see image above).
For people who don't want to connect directly via SSH (a handling error can happen very quickly), LWS offers managed services.
There are two solutions: either you have subscribed to a support option: this service is included in your package --> simply open an incident ticket with the technical department to request the creation of your VPN.
Or you can set up a one-off managed service: a technician will call you back within the hour and carry out the work with you. The technician will take the time to answer your questions and explain the changes you have made.
Rate this article :
4.3/5 | 6 opinion
This article was useful to you ?
Yes
No
1mn reading
How do I change the SSH password for a VPS dedicated server?
1mn reading
How do I reset a dedicated VPS server?
1mn reading
How do I restart / shut down a dedicated server?
0mn reading
How do I manage my dedicated VPS server from my LWS Panel customer area?
Hello,
Thank you for your message.
Unfortunately, we don't have a video on how to create a VPN using a VPS. This documentation is rather old and out of date, however there must be many videos on YouTube about creating a VPN on a VPS and I would urge you to do some research on this subject.
I thank you for your attention and remain at your disposal should you have any further questions or require additional information.
Sincerely, The LWS team